- This item has a Codex entry: Battle of the Selle
— In-Game Description
Giant's Shadow is a map that appears in Battlefield 1.[1] First revealed in the promotion of the Battlefield 1 Ultimate Edition on Origin, the map released for free post-launch on December 20, 2016, with Premium members and those who pre-ordered any edition gaining access to the map a week in advance on the 13th.
The map takes place during the Battle of the Selle in October 1918 as part of the Allies' Hundred Days Offensive, and features the British and German armies fighting for control of Le Cateau-Wassigny Railway in the open fields along the Selle river. A crashed airship serves as the map's centrepiece. The Armored Train is the map's behemoth. The patch that added the map also introduces the new gadget for the Support class, the Crossbow Launcher.[2]
Overview[]
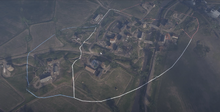
The terrain of Giant's Shadow is that of a gradual valley, comprised mostly of farmland, with a few built up areas on the periphery. A crashed airship, which has split into many sections upon impact and half-buried in the hillside, provides both the immediate visual and strategic focal point of the map, due to its prominent position on the high ground squarely in the map center. The surrounding hillocks, fields and dirt roads of the valley's lower ground are devoid of cover save for a few scattered "islands" of boulders, trees and roadside ditches. Traversing the valley floor can therefore be perilous when on foot, as players can be quite easily picked off at range from the enemy controlled high ground.
The Caudry and the Railyard at Le Cateau Station, on the north and south ends of the map respectively, offer more considerable cover, as well as the possibility of close-quarters fighting. The map also features a shallow river, running parallel to a single-track railway in a curved path from the north-west, passing through the Village on the map's northern side as well as the nose section of the downed airship before continuing to the south-east. Due to its location in a valley, the fog on this map is noticeably thicker than on others, should it roll in during the battle.
Behemoth[]
The Behemoth of this map is the Armored Train, travelling into the map boundaries from the losing team's side of the map. Its track runs across the map east to south-west, putting the train in proximity to the Junction, Lower Crash Site and Railyard objectives.
Control Points[]
| Control Point | Conquest | Domination | Rush | Shock Operations | Incursions |
|---|---|---|---|---|---|
| German Deployment | |||||
| 1A / 1B | |||||
| Village | A | 2A / 2B | 1A | A | |
| Artillery Base | 1B | ||||
| North Village | B | ||||
| Junction | B | 3A / 3B | 2A | C | |
| Lower Crash Site | C | 4A | 3A | ||
| Upper Crash Site | D | 4B | 3B | ||
| Logging Camp | E | ||||
| Railyard | F | 4A | |||
| Supplies | A | ||||
| Maintenance Yard | B | ||||
| Luca's Stable (Lumber Yard) |
C | 4B | |||
| British Deployment | |||||
Conquest[]
Conquest takes place across the map's full length, with combat generally concentrated within the map center. Four control of the six points are found relatively close to one another in the midst of the crashed airship, while the flags closest to each team's spawn lie further afield. The handful of ground and air vehicles should be used to augment infantry pushes across ground that is mostly unsuited to them. Furthermore, the plentiful light vehicles such as scout cars and motorcycles can be used to quickly bypass the frontline and reach the more distant objectives.
There are six objectives in Conquest. The flags are arranged in a zig-zag formation from north to south. The crashed airship and its twin objectives divide the map lengthways into north and south, and commonly acts as the map's Conquest frontline.
Equipment[]
| Light vehicle(s) | |
| Tank(s) | |
| Fixed-wing aircraft | |
| Light vehicle(s) | |
| Tank(s) | |
| Fixed-wing aircraft | |
Deployments[]
In Conquest, the German Empire deploy from the hillside on the north-western edge of the map, while the British Empire starts on the valley floor to the far south.
German Deployment[]
The German army starts from a farming courtyard nestled in the hillside dotted with windmills to the north-west. Their main route of advance, lined with drystone walls and roadside divots, carries them downhill towards the Village, although it branches off before this point, allowing vehicles to bypass the objective along the perimeter of the surrounding fields to the east and south-west.
A QF 1 AA gun is emplaced by a sandbag wall in the southern corner of the courtyard.
")
")
")
British Deployment[]
The British team's main base is a small farmhouse on the southern side of the map. Two roads lead north, parallel to one another, away from the house and accompanying stable buildings and towards the Logging Camp and Railyard objectives respectively. The surrounding terrain consists of tilled fields and stubby foothills.
A QF 1 AA gun is set up in the courtyard near a large oak tree to the south-west.
")
")
")
Flags[]
Village[]
The Village objective is found at the base of the hill close to the German spawn, on the north side of the river. A fairly expansive urban area, the main road running through this area is lined with red-brick houses and their accompanying backyard enclosures, bordered by high walls. The north side of town consists of one and three-storey residential buildings and private gardens, while on the other side of the main road, lining the riverbank, are larger, more open compounds consisting of more rural structures. The capture zone is concentrated around the north-side houses, and encompasses a high-walled backyard scattered with bundles of lumber. The control area extends to the upper floors of some of the buildings, requiring close range fighting to seize. Vehicles can be used to blast holes in the building and perimeter walls to grant new sightlines and routes of access.
The Village will spawn one Motorcycle and one Scout Car when captured. It additionally provides one extra tank spawn if the flag is taken by the Germans.
")
")
")
Junction[]
The Junction objective is located alongside the southern bank of the river, and parallel to the map's single-track railway. A stone bridge across the water connects to the main road (although is not entirely necessary as the river is generally shallow enough to ford), which crosses the railway on its route through the Village to the north - the objective name refers to the intersecting of these three elements. The area is overlooked to the south by the hill holding up the crashed zeppelin. The capture point itself is characterized by a cluster of small buildings situated within a level clearing, encircled partially by head-high brick walls and a seated berm. On the north side of the clearing is a stone stable; to the south, a cottage; and to the east, two semi-detached houses, one of which includes an upper level. These represent the extent of the (destructible) cover here, although the stone embankment to the south-west can provide vital shielding against the high ground, as can the river bank and the raised rail track.
The flag provides one motorcycle and one scout car spawn. A QF 1 AA gun is emplaced in the back yard of the houses on the east side of the capture zone.
")
")
")
Lower Crash Site[]
The crashed airship, embedded within the much-coveted central high ground, spans most of the horizontal play area. The surroundings, scorched and mostly featureless, make an approach to the objectives difficult should they be controlled by the opposition. The north-eastern objective is situated at slightly lower ground, and encompasses the sunken nose of the airship, partially submerged in water about the bend in the river. The capture radius does not extend beyond the tattered walls of the airship's skeleton, which block lines of sight, therefore concentrating engagements within the makeshift tunnel of the behemoth's interior. Those seizing the objective can either take cover in the swamped nose section or the debris uphill to the north, while the open area accommodating the train line can allow vehicles to provide their support.
Yellow helium tanks litter the ground inside the shattered frame of the Airship, which becomes an explosive hazard if shot or driven into. Outside the airship, an FK 96 field gun spawns near the aircraft's midsection to the north-west. A scout car may spawn outside of the airship around this objective once captured.
")
")
")
Upper Crash Site[]
The tail end of the airship came to rest at a slightly higher elevation that the rest of the Airship's fragments, allowing fighters in position along the far south "ridge" to fire down onto the lower ground of the interior. A narrow roadway cuts through the sides of the wreck, creating a no-mans-land in the capture zone between the upper ridge and the rubble and debris adjacent to the flag itself. Here, as with the rest of the map, control of the high ground is the key to winning the objective.
Additional yellow containers are scattered within the middle section, making the low ground even more perilous to fight in. Fallen gun canopies on both the north and south side of the blimp can be used as makeshift bunkers, as their 20mm armament remains mounted and sighted towards the base of each side of the hill. Another FK 96 is dug in on the opposite side of the midsection, to the south-east.
")
")
")
")
")
Logging Camp[]
The Logging Camp is located on the southern-half's west side, downhill from the Upper Crash Site, and uphill through a large muddy field from the Railyard. The area consists of a rectangular shed-type building with rafters, surrounded by piles of lumber. The objective, being situated on level ground overlooked to the north and west by rolling hills, offers limited directional cover, with the path between this flag and the airship being obscured partially by trees and outcroppings. The position does, however, allow for an effective defense against those slogging through the morass to the south-east.
The objective spawns just one Motorcycle when held.
")
")
")
Railyard[]
The Railyard objective is found adjacent to the river on the map's south-eastern side. The main road to the British spawn and the map-spanning rail line end up parallel at this objective. On the eastern side is an expansive network of siding, most of which are cluttered with stationary railway cargo cars. On the west side, a row of multi-story houses preside over the lower ground. The capture zone on this objective is quite large, and offers many places for capturing players to hide. Securing the objective may require house-to-house fighting, rooting enemy players out from inside or under train cars. Take note that tanks are a common sight here, as the flag itself and the nearby British base can spawn them - such vehicles can be useful in clearing out the enemy, should you wish to demolish the buildings and rail carriages instead of fighting for control of them.
The objective spawns one Motorcycle and one Scout Car upon capture, also granting an additional Tank spawn if captured by the British. A QF 1 AA Gun is emplaced on the platform between the main road and the rail track, directly adjacent to the flag itself.
")
")
")
Shock Operations[]
In Shock Operations, the Germans make a daring attack against the British-held section of the front in northeastern France. The aim of their four-phase battle plan is to cross the Selle river and sever the allied railway artery at Le Cateau.
Depending on if and when the first German battalion is defeated, they are reinforced either with a selection of elite kits or the Armored Train.
Sector 1[]
The start of the operation depends on the Germans clearing the defenders from Caudry Village on the east bank of the Selle. They launch their assault from their hilltop Conquest deployment location to the northwest, and must traverse the open ground before reaching the town and its two objectives. Objective A, Village, is at the east end of the settlement, roughly equal in position to its Conquest location and concentrated around a compound used for storing timber. The capture zone is surrounded by a high brick wall, and also includes the bottom floor of two houses the face the main road. Objective B, Artillery Base, is in the southwestern quarter. The yard is the stationing point for a battery of howitzers, and is only enclosed from the north side by a bungalow and a brick wall.
The sector is generally quite challenging for the attackers to overcome. To reach the objectives, they must cross an open field, which due to the reverse slope is almost completely devoid of defilade or protective terrain. Players can take wide flanks around the edges of the fields to the north (although German attackers pushing in from this side will have to contend with an emplaced Maxim gun, set upon a hill outside the walls at Village), or along the riverbank to the south, in an attempt to reach the objectives. Once one is taken however, the short distance between the two means the defenders can rapidly respond, and their sector deployment over the bridge at Junction is considerably closer to the flags than the Germans'. Capture of the town is, therefore, best accomplished with either a rapid, coordinated attack, or a staunch defense of one of the two objectives upon seizure.
The Germans make the downhill assault with the support of two tanks, two horses, and two planes. The British defend with parity in all vehicles except tanks, which they receive only one of. For countering German planes, the British have two QF 1 AA guns - one in a back yard on the northwest side of town, and another in the middle of the clearing at Junction across the river. The Germans have two AA guns of their own in their main base.
Should the Germans falter at this sector, their subsequent wave is granted access to a Sentry, Sentry SMG, Flame Trooper and Infiltrator elite kits.
Sector 2[]
Once through Caudry, the Germans are tasked with securing the river crossing. The single objective in this sector, Junction, is once again located similarly to its Conquest position, albeit with an expanded capture radius that now includes the barn, train tracks, south-side cottage and the ground floor of the buildings to the east.
As a singular objective, the British defense is expected to be consolidated as before, with the Germans again facing difficulty posed by the terrain, which now requires them to ford a river under fire. As in the last sector, skirting the extreme edges of the play area allow players to avoid the most hotly contested sections of the riverbank, and attack the objective from the flanks. The buildings around the objective, being the primary source of concealment and giving a vantage point over the river, can be shelled cover to the assault, or demolished to deny cover to the attackers.
The British receive a Tank Hunter kit, available at the airship's Lower Crash Site. Alongside the QF 1 AA gun, another heavy machine gun is set up on a berm along the southeast edge of the capture zone.
At this point, if the first German battalion is wiped out, they are reinforced with an Armored Train.
Sector 3[]
The assault continues back uphill towards the downed airship, with objective A located within the Lower Crash Site and objective B within the upper section.
Yet again, the defenders have strong initial positions within the sector against the Germans who must cross the open field between the airship skeleton and Junction. Inside the skin, cover is sparse and one-directional, with the high ground at the end of the tail section and the flooded crater in which the nose section rests being the most substantial hiding spots. Flanks around the sunken nose of the airship and behind the tail permit attackers to get in between the British flag deployments for this sector, preventing them from reacting. If the sector flags are neutralized, the British are left having to spawn in at the Logging Camp far to the south.
The attackers lose their cavalry support at this stage, whilst the defenders have access to an FK 96, positioned at the waist of the airship. They can also use the HE Autocannon on the ruined gondola around the northwest side. A single MC 18J Sidecar spawns at the Logging Camp.
Sector 4[]
Sector four takes place around the Railway station across another stretch of meadow to the south. The first objective is the Railyard, in the southeast quarter of the complex. Parallel to that, behind the row buildings dividing the area vertically, is the Lumber Yard objective.
Due to both of the objectives being positioned along the far edge of the settlement relative to the Germans, the attackers will have to fight through the urban terrain to reach the capture areas. The placement of both objectives limits the mobility of tanks and other vehicles, due to the narrow gaps between the platform and stationary rail cars at the former objective, and the amassed lumber piles within the latter, while plentiful overhead cover also weakens the effectiveness of aircraft. Therefore, weight of numbers of infantry is the primary method of seizure in this final battle.
In this concluding phase of the operation, the Germans receive two EV4 Armored Cars, although they actually spawn in Sector 3, allowing their use by the British. The vehicles are useful in crossing the open field between the Crash Site and La Cateau Station. They lose their two aircraft in the process.
The British in turn, pushed back into their Conquest deployment, have their own open field to traverse, and are granted one of each of an RNAS Armored Car, an M30 Scout, and an MC 18J Sidecar, in addition to another tank and their unaltered complement of Horses. Furthermore, two Tank Hunter kits can be picked up from the barn in their main spawn. Stationary emplacements around the station include two FK 96 guns on the outskirts, and a QF 1 AA located on the platform.
Once the sector falls, the Germans can claim a decisive victory over the British and their allies, who for their part lament the loss of ground. Both sides are seemingly oblivious that the war is mere weeks from ending, and that the outcome has indeterminably prolonged it.
Rush[]
In Rush, the German forces are tasked with attacking southwards from the windmill-imbued northern high ground, crossing the river and valley floor before taking their final objective within the Crashed Airship. The British must defend their communication lines to block the German advance.
Sector 1[]
The initial objectives are within the farm courtyard typically characterised as the German's Conquest spawn location. The British start behind the hill, advancing up to the plateau to form their defense, while the Germans must charge downhill from the northern-most windmill, through open fields with few permanent cover positions. A single tank is allocated to their side to assist with the assault.
Sector 2[]
The second pair of objectives are within the Village at the base of the hill. One is typically on the north side of the main road, proximal to the Conquest flag's exact location, while the other is usually located around the south-eastern outskirts, close to the river bank. The Germans are issued with a single tank and a KFT Scout, while the British also receive a tank for support.
Sector 3[]
In the third phase, the attackers must cross the river to reach the Junction clearing.
Sector 4[]
In the final phase, the German team must forge their way uphill across exposed ground to bomb the telegraph posts emplaced within the airship interior.
Domination[]
Domination takes place around the Railyard on the map's south side. The play area includes the shunting area lined with cargo cars to the east as well as the backside of the houses up a short hill to the west.
Supplies[]
The Supply area is identified as a small shed on the north-east side of the play area. The capture zone, which extends a considerable distance southwards, is partially surrounded by a wooden fence, which provides a destructible line of sight blocker, as well as two rows of train cars further to the south and west, which form a more permanent obstruction.
")
Maintenance Yard[]
The Maintenance Yard is a small objective situated on the platform on the map's southern edge. The capture radius includes two rows of train cars that can be used as cover, by either going inside them or lying underneath them.
")
Luca's Stable[]
This objective, which confusingly shares a name with an objective in Monte Grappa, is positioned on a raised foundation behind the row of buildings to the west. The capture zone includes an initially intact stable building, while the flag itself is surrounded by piles of lumber and a tall wooden fence.
")
Team Deathmatch[]
Team Deathmatch takes place around the Railyard.
War Pigeons[]
War Pigeons takes place in the same area as Team Deathmatch.
Incursions[]

Giant's Shadow is redesigned exclusively for the Incursions gamemode. Unlike standard gamemode maps, Incursion maps feature two spawn points for each team's deployment, connected by three progressive control points that must be captured in order.
Action takes place in an area corresponding to the original map's Village and Junction. The namesake downed airship visible in the background to the southeast. The village is more dense with small buildings, and has more changes in elevation.
Gallery[]
")
")
")
")
")
")
")
")
")
")
")
")
")
")
")
")
")
")
")
")
")
")
")
Trivia[]
- Giant's Shadow appears to be based on the final map of the first War Story, Through Mud and Blood.
- In the Polish version of Battlefield 1, this map is named "Upadek Kolosa", which means "The Fall of Giant".
- Despite the map's historical setting during the Allies' Hundred Days Offensive, in both Rush and the later-added Shock Operations game mode, it is the British who are defending with the Germans attacking instead.
- In the game files this map is named MP_Giant.
- The internal name for this map in Incursions is MP_Giant_Callisto.
| ||||||||||||||||||||