Port Valdez is a map featured in Battlefield: Bad Company 2. It is a fairly long and narrow map. It is seen to be a turning point in the war for Russia. After facing defeat in South America, the Russian Federation turns its eyes towards Alaska, where most of the USA's oil and gas reserves are located, presenting an opportunity to cripple the USA and swiftly move in for the killing blow.
Rush[]
Equipment[]
|
|
| |||||||||||||||||||||||||||
Bases[]
Attackers Deployment[]
The Attackers start of parachuting out of An-124s, descending to the ground where one T-90, one BMD-3 Bakhcha AA, two Quad Bikes and one UAV Station are spawned. Be careful when parachuting down, as a skilled marksman can pick you off as you parachute. It is recommended not to spawn at the attackers deployment after the initial parachute; rather, use squadmates. In the first part of the game, this area is out of bounds to the defenders, but later on defending helicopters can use this area to land and repair. Attackers can guide their parachutes to the pipes on the hill to the right and use it as a sniper position or to sneak up on objective Alpha.
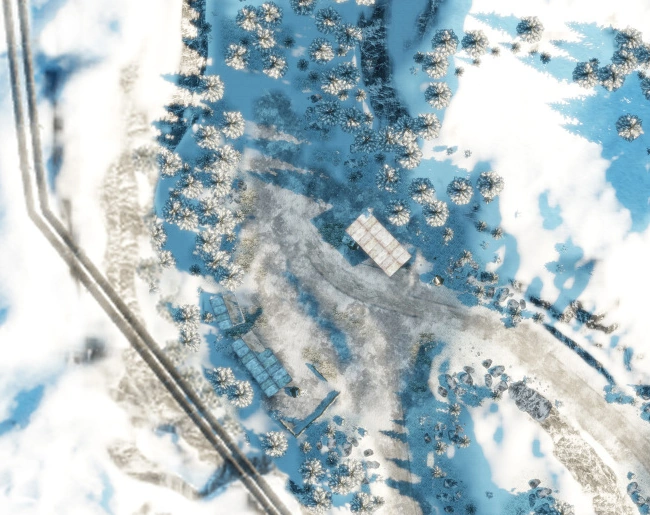
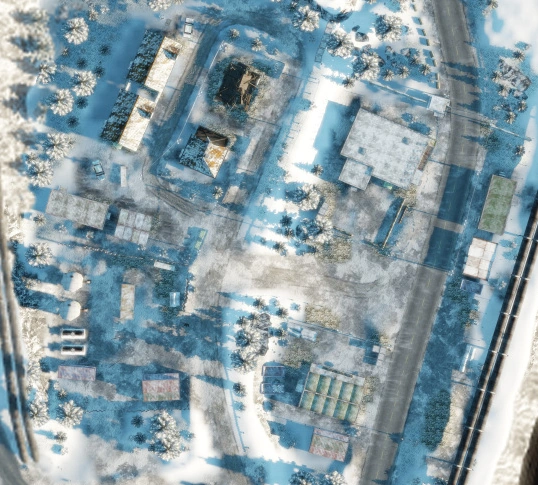
Construction Site[]
The Defenders start off with emplaced XM312 Machine Guns and BGM-71 TOW Launchers.
Objective Alpha is located in a small house, surrounded by trees that provide good cover for Attackers and is easily collapsible.
Objective Bravo is located in a crater within view of snipers from both the Attackers' cliff and the building under construction. Clearing the construction building immediately after arming Bravo is advisable because players in the crater are extremely vulnerable from either of the buildings.
The key defensive buildings are the building under construction and the house overlooking objective Alpha. Both buildings can be used to the Defenders' advantage; the house's machine guns can be used to hold back Defenders and Attackers going for objective Alpha as well as players inside the building under construction.
The building-under-construction's emplacements can be used to take out enemy tanks and infantry but can easily be overrun by one enemy soldier with a Quad Bike, because the turrets cannot aim downwards. The construction building is often the most heavily defended, because it contains one of the TOW launchers with a view of almost the entire area. The building itself is not destructible, but lacks cover for Defenders, so they are forced to continue moving to stay alive. The house overlooking Alpha contains much more cover than the construction building, making it a better place for re-spawns. Under heavy bombardment, however, this building can collapse, seriously impairing the defenders. Furthermore, if taken by an attacker, the machine gun on the second level becomes dangerous to any defenders behind the construction building.
Another tactic for the Defenders is to go for an aggressive approach; 2-8 people, preferably with multiple Medics, stay atop the mountain overlooking Attackers Deployment to call out and pick off Attackers before they have a chance to reach either objective. If the Defenders maintain a strong front line, with more than one medic reviving dead teammates, the Attackers' numbers can be substantially reduced. Engineers can lay anti-tank mines to deter enemy vehicles from progressing. Keeping several Defenders near the objectives, in case an Attacker manages to get to and arm the M-Com stations, is recommended.
Attackers may generally opt for one of two tactics: A full-blown charge down the defenders right flank or straight down the main road taking as many emplacements as possible. This is a good tactic if the Defenders decide to charge the frontlines since Attackers can easily break through enemy lines if there are no mines planted. The other tactic is to utilize the T-90, shooting Objective Bravo from afar in order to destroy it, using the hill and trees as cover and keeping an engineer to perform repairs when needed. There are several sniping positions as there is a very thick forest covering the majority of the area. However, the narrow strip along the pipeline can be accessed by spawning at the base and parachuting onto the pipe or on the ridge. Note that whilst this tactic will generally provide players with a good view of Bravo and the construction building, the attempts required to stay to stay inside the playing field may not be worth the good position. When used with a frontal assault by tanks as a diversion, many Defenders can be taken down with ease.
Attackers are well advised to make use of the UAV's rocket capability to destroy the defenders BGM-71 TOW Launcher and Heavy Machine Gun emplacements on the construction site since both stationary guns can severely hamper progress of the assault. The TOW can destroy a T-90 tank at a considerable distance whilst the Machine Gun can put out considerable damage to prevent the attackers infantry from advancing. If UAV support is unavailable, then rocket fire provided by Engineers becomes priority.
After being taken, the base will spawn one T-90 and one BMD-3 Bakhcha AA vehicle.
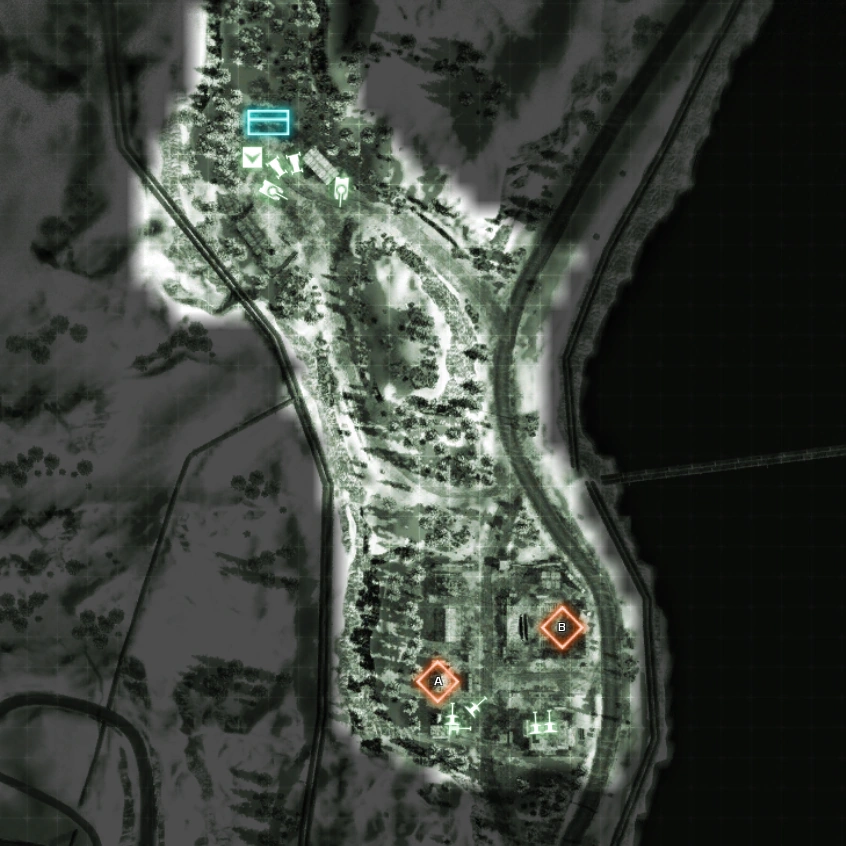
Office Site[]
The Office Site has XM312 Machine Guns, a BGM-71 TOW and an M3A3 Bradley.
Objective Alpha is housed inside an office building and Objective Bravo is inside a two-story house. Objective Alpha may be destroyed using Destruction 2.0, if other attempts turn out to be futile. There are barriers on the main entrance of the site, but these can be taken out easily by tanks or the stationary AT inside the construction site, even at range. Defending this point can turn out difficult due to the heavy fire suppressing Defenders.
Objective Bravo is in the furthest two-storey house from the base. The building is destructible, but achieving this is difficult as the tanks only rarely reach this point and C4 is difficult to plant without being detected. Attackers can choose to rush over the hill as quickly as possible and take the first two-storey house as a refuge point. The building provides good cover for defenders as it contains a machine gun that can be used to cut down any attackers that may charge down the hill.
Defending this base is difficult due to the sheer lack of firepower. However the two shielded machine guns should not be neglected as they have a good view of the road and hill respectively. The TOW should also be manned in case a tank makes it past the office building as the Attacker can leave his vehicle and take the M3 Bradley APC to assault Bravo. Another tactic is to climb up the ridge on the left hand side of the base. It can be accessed by going behind the large explosive tanks of gas, progressing through a restricted area and continuing all the way to the attackers sheltered hill allowing any Defenders to pin down their enemies. This position is not easily defended though, and is easily destroyed by Recons or their mortar strikes. Another tactic is to plant and detonate C4 amidst the trees along the road and hill to the left until they are destroyed. A soldier out in the open is highly exposed, putting the attackers at a great disadvantage. This strategy also works at the beginning of the game.
Attacking is fairly easy once the frontline is taken. Using tanks as a diversion, one can simply flank and gain access to either of the objectives. One rarely used route is to climb the hill using the heavy tank. Whilst it is susceptible mortar strike and engineer fire, it does give a quick route to Bravo by bypassing the danger of the TOW and allows squad members to spawn closer to Bravo.
When the base is taken, a GAZ-3937 will spawn, alongside a T-90 and a BMD-3 Bakhcha AA tank.
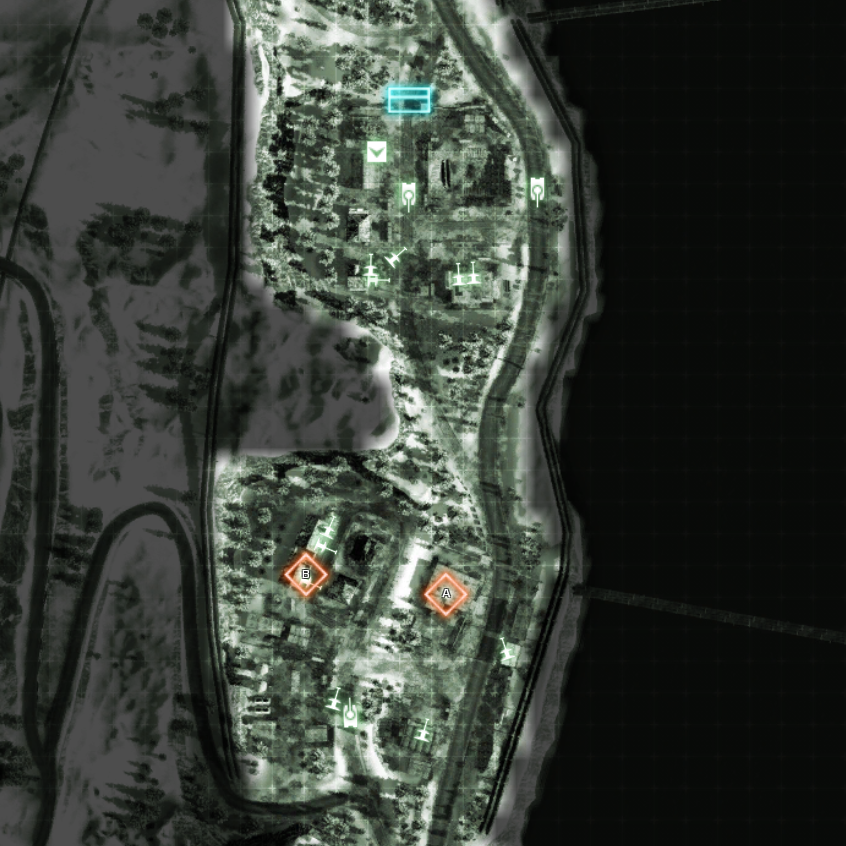
Harbor[]

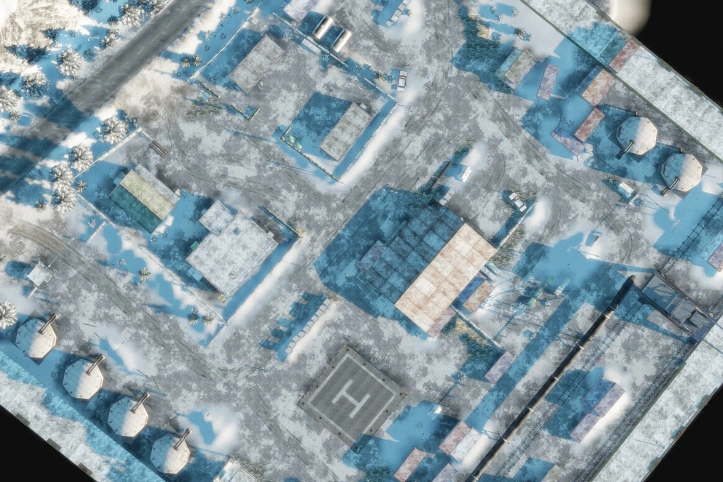
The Harbor has XM312 Machine Guns, a BGM-71 TOW, an M3A3 Bradley and an AH-64 Apache. The Emplacements are located on an office building near Alpha and a building under construction near Bravo, the Bradley is located near Alpha and the Apache is on a helipad near Bravo.
Objective Alpha is located in the barracks in front of the office building and is can be, among other methods, taken by arming the charge under heavy fire of an allied tank. Note that the machine gun and TOW on top of the office building can make it hard to take the objective without some fire on the emplacements.
Objective Bravo is in the large warehouse. This objective can almost exclusively only be destroyed by mounting an infantry offensive as a large indestructible container blocks the target from being destroyed by tanks. Heavy fire from tanks can help but it will most likely come down to close quarters combat within the warehouse itself. Taking out the wall that blocks the machine gun in the construction site will help in defending it.
Defenders should make full use of the cover provided by the defilade by the river and the blind turn and trees along the road to ambush attacking vehicles with anti-tank weaponry, as well as positioning Medics and Assault players to engage enemy infantry and provide support to the Engineers. Recons can be used to take out more distanced targets, and the AH-64 provides a distraction for enemy engineers and tanks. It is recommended to have an engineer filling one of the seats, allowing the pilot to land the helicopter and make repairs. The close confines of the port itself can make defending difficult, but small one or two-man teams armed with close combat weapons, as well as a rapid-firing light machine gun such as the MG3, can easily eliminate attackers who have entered the area. Waiting for the Apache helicopter to respawn is not recommended, the respawn being lengthy. It will also not respawn if a player is standing in its spawning place.
Attackers should use the BMD-3 AA to destroy the helicopter as fast as possible and flush out any Defenders still in the Office Site area eliminating a threat from behind as the assault begins. Tanks draw a lot of anti-tank fire while moving, so a driver should try to make it into the base quickly. Squadmates spawning on the tank is a good way to deploy reinforcements into the base. Attackers can also infiltrate the harbor using the forest on the side of the lake as cover, and climb the last ladder on the harbor wall to get into the base. Progressing stealthily through the base either via the containers near Bravo or through the office buildings near Alpha are good options, as they are commonly undefended. A small window in the side of the large warehouse containing M-Com Bravo is positioned conveniently for sneaking up to the objective. Dominating the vehicle spawns is a good way to put pressure on the Defenders. An attacking Recon can hide in the large buildings behind the Helicopter pad, and they can take shots at defenders waiting for the Bradley or the Apache, or even into the warehouse where Bravo is located, which can be useful when the charge has been armed. Another strategy dubbed the "Navy SEALs" is when a squad of players sneak up through the cargo ship and surprise the enemies from their right flank.
When the base is taken, a T-90, BMD-3 Bakhcha AA and UAV Station will spawn.
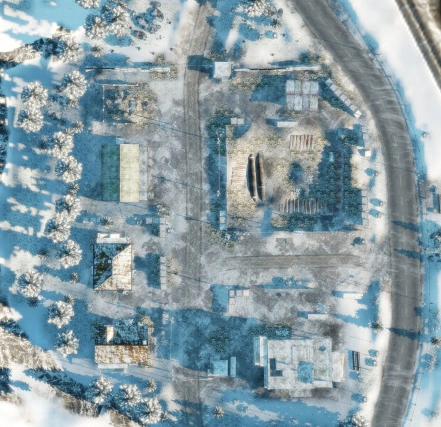
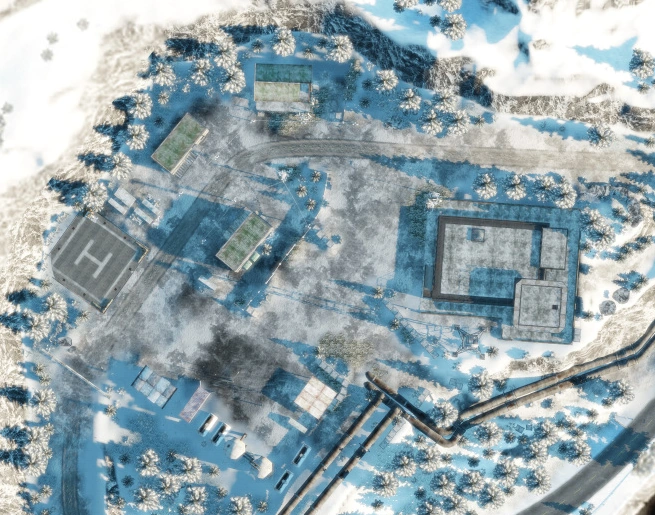
Comm Depot[]

The Communications Hub is the last stand for the Defenders, and several machine guns as well as TOW emplacements are available and a UH-60 Black Hawk is on a landing pad near Alpha.
Objective Alpha is on the first floor of the two-storey barracks closest to the metal wall. It can only be taken by bypassing Bravo and catching the defenders off-guard or mounting a heavy assault against it.
Objective Bravo is in the Comm Center and can be taken by an assault through the complex. Though part of the complex is vulnerable to Destruction 2.0, it does not contain the M-COM.
Defending this map may take patience and good positioning. Starting by defending Bravo is a common tactic, as Alpha is rarely attacked first. A good tactic is to spread out with a some people covering the forest and several Engineers placed along the main road and the rest either patrolling the inside or outside perimeter of the building. Medics are important for a good defense. Placing someone inside the main room to defend the objective is important, as once armed, disarming it may become a difficulty. The roof is accessible but Recons from the harbor may be watching. If Bravo is taken then immediate retreat is recommended. Manning the machine gun emplacement on the second floor of the most distant barrack and the TOW emplacement nearby. Attackers at this point can attack from both left and right using both of their 2 tanks. AT mines are more effective than using RPGs as there is already a TOW. Care is required for the Defenders' team helicopter not to be taken by Attackers.
Attackers will need some time getting to the base. The options are either to sneak around the Comm Center via the forest and behind the gates, assault directly up the hill and into the Comm Center on foot via the pipeline or the hill with the concrete blocks, assault up the hill using the road, preferably with one of the tanks. The flank is the best option if squad members intend on spawning on the player's position as very little players generally guard Alpha. Once again, the AA tank will be important in taking down the helicopter. The direct attack up the hill is the only option for tanks, as shooting from afar is not effective in this part of the map. Achieving victory may require a well coordinated and well timed attack in waves. When attacking Bravo smoke grenade launchers and motion sensors to provide cover and track soldiers may turn out useful.
Squad Rush[]
The Squad Rush variant of the map is reversed, the Americans are the Attackers and the Russians are the Defenders. The bases are also in reverse.
Bases[]
Attackers Deployment[]
The Attackers Deployment is at a road leading out of the map near the office site. This area is inaccessible in the Rush variant of the map.
Office Site[]
The M-COM station is located in the Office building, there is a KORD Heavy Machine gun nearby and on top of the office building.
Construction Site[]
The M-COM station is located in a Warehouse; it cannot be destroyed using Destruction 2.0. There are several machine guns overlooking the warehouse that can be used by Defenders to stop Attackers from entering the warehouse, or by Attackers to prevent Defenders from disarming the charge.
Conquest[]
The Conquest variant of Port Valdez was released on 7 July 2010 as a part of VIP Map Pack 4.
Equipment[]
|
|
| |||||||||||||||||||||||||
Bases[]
Like in Rush, this map has very open control points with narrow passages between them - making them choke points for passage to the next area. Bravo will be key to hold in the battle as Alpha and Charlie will largely remain in control of their respective teams they are closest to, unless a player or squad can slip by unnoticed.
RU Deployment[]
A Mi-28 Havoc, two T-90 MBTs, a CAV, a KORD with a ballistic shield, a 9M133 Kornet and a ZU-23-2 AA gun spawn regularly here. Unlike in Rush, the Russians do not have to parachute in to their base as they spawn on the ground.
A: Construction Site[]
The Construction Site's control point is right next to a small warehouse along the road and it is closest to the RU Deployment. This area provides decent cover with the forest in back, the two houses, and the building under construction that can be used to snipe towards Bravo from.
RU Control[]
A T-90, a 9M133 Kornet, a KORD and a CAV spawn regularly here.
US control[]
A BGM-71 TOW and a XM312
B: Office Site[]
The Office Site features an open area to capture the control point near the ramp leading up to the houses and UAV station. The station is well defended being next to an indestructible rusted iron wall, but helicopters can easily destroy it. If the US captures this point, the VADS that spawns on top of the Comm Center can easily take out the Russians' Havoc, hence denying them air superiority. It and the ZU-23-2 also have the ability to hit enemies coming in on the hill towards the base from Alpha. This base is important since it has the UAV Terminal and Anti-Air gun. It can also play a role in deciding which side is able to have air support.
RU Control[]
Two 9M133 Kornets, a KORD, a UAV-1, and a ZU-23-2 spawn regularly here.
US Control[]
Two 9M133 Kornets, a KORD, and a VADS spawn regularly here.
C: Harbor[]
The Harbor control point flag is located next to a Comm Center where the XM312 and TOW spawn on top of. The large open area of the harbor allows covert teams to sneak around the outskirts, back towards the under-construction building and move in towards the control point.
US Control[]
An M1A2 Abrams, a CAV, an XM312, and a BGM-71 TOW spawn regularly here.
RU Control[]
A 9M133 Kornet and a KORD spawn here.
US Deployment[]
An AH-64 Apache, two M1A2 Abrams, a CAV, an XM312, a BGM-71 TOW, and a VADS spawn here regularly. Since the VADS is very effective at taking out enemy helicopters, it is unlikely that an enemy will try to attack the base with one unless they target this first.
Outcome[]
US Victory[]

If the US succeed, the Russians break off the assault at whatever point they are at and fall into retreat, ending the Russians' American Campaign. The US armor reinforcements are shown rolling into the harbor and air support in the form of A-10s arrives to proclaim victory.
Russian Victory[]

If the Russians succeed and overpower the Americans, then the command post is captured, and the pipeline beside it is rigged and detonated, causing the destruction of the oil silo located further back. The Russians would do the same to all silos, causing the US power-grid to be knocked out in several areas. This would set things up for a Russian invasion of the USA.
Gallery[]
")
")
Videos[]
")
")
")
")
Trivia[]
- The map was featured in the PlayStation 3 and Xbox 360 demo, as well as the PC Beta Trial.
- The winning outcome for the Americans in the Beta showed an A-10 "Warthog" destroying the harbor. This was changed in the final release to M3A3 Bradleys and A-10's securing the harbor instead.
- The map was likely inspired, at least in name, by the Battlefield 2: Armored Fury map Midnight Sun, where the US defends the Alaskan port of Valdez against invading Chinese PLA forces.
- If the player presses the jump button as soon as spawning (when attackers) their parachute will undeploy, causing them to commit suicide.
- There are several M-COM stations that can be destroyed by demolishing the buildings that contain them.
| ||||||||||||||||||||