— DLC Overview - Battlefield.com
Rupture is a map featured in the Battlefield 1: They Shall Not Pass expansion. It takes place in the Allied counter-offensive of the Second Battle of the Marne, where Germans were forced to move back to a line running along the Aisne River.
On April 18, 2018, the map was made available to all players.[1]
Overview[]
The scars left by the last battle over the Aisne region, not even a year ago, are faded but still visible. The rusted carcasses of French tanks line the sunken roads and perforated fields of the south bank of the river. Pillboxes and trenches along the southeast approach are overgrown with moss and ivy, with the churned landscape they look out upon now dyed a brilliant scarlet by wild poppies, giving the map a distinctive hue. On the opposite bank are the German's second line of defense, constructed to protect the rail hub and its accompanying heavy artillery, a Langer Max railway gun that fires sporadically into the distance. A handful of rural settlements are found along the modest network of dirt roads.
The map is cut in two by the large gorge through which the Aisne river flows. There are several crossing points, with a large railroad viaduct in the center, a smaller road bridge to the west, and duckboards and log pontoons across the shallow mudflats of the east.
Behemoth[]
The Char 2C super-heavy tank is this map's Behemoth.
Control Points[]
| Control Point | Frontlines | Conquest | Domination | Operations | Rush |
|---|---|---|---|---|---|
| Distillery Ruins | 1A | ||||
| Moltke Trench | 1B | ||||
| Côte 60 Trenches | A | A | A | 2A | 1A 1B |
| Chezelles Farm | B | ||||
| Notre Dame Ridge | B | D | 3A | 2A 2B | |
| Aisne-Vesle Bridge | C |
3B | |||
| Le Cormieux Farm | C | E | 3C | ||
| Langer Max Gun | 4A | 3A 3B | |||
| Mahler Trench | B | ||||
| Bazoches Station | 4B | ||||
Conquest[]
There are a total of five objectives in Conquest, arranged with two on opposite sides of the river, with the fifth flag located on the bridge in the direct center of the map. The river gorge is the main obstacle to progression, with control over the river crossings vital to holding the enemy back from each team's riverbank. A large amount of light motorised vehicles, available from most flags upon capture, provide players with a high degree of mobility.
Equipment[]
| Light vehicle(s) |
1 Horse |
| Tank(s) |
2 FT-17/Mark V/A7V/Artillery Truck/St Chamond/Putilov-Garford |
| Fixed-wing aircraft | |
| Light vehicle(s) |
1 Horses |
| Tank(s) |
2 FT-17/Mark V/A7V/Artillery Truck/St Chamond/Putilov-Garford |
| Fixed-wing aircraft | |
Deployments[]
French Deployment[]
The French deploy around the trench lines in the map's southeast corner, near the gun positions of Moltke Trench. The overgrown earthworks follow alongside the road west, uphill towards Côte 60.
A QF 1 AA gun is emplaced near the main road for close air defense.
")
")
")
German Deployment[]
The German start inside the train station compound in the map's far north. The rail track can be followed directly south to the Aisne-Vesle Bridge, whereas the roads curve around the hillock that blocks the nearby Le Cormieux Farm from view.
The Germans have their own QF 1 AA set up inside the compound near the main station building.
")
")
")
Flags[]
Côte 60 Trenches[]
The trench maze of the southeast reaches the heights of Côte 60, where three concrete pillboxes are constructed overlooking the low ground. The capture zone generally includes the large square box trenches behind the pillboxes. The trench lines continue further westwards pursuing the river, eventually reaching a salvage yard for destroyed tanks at the south end of the Aisne-Vesle Bridge. To the north are a pair of rudimentary river crossings over mudflats that lead to Notre Dame Ridge.
A team-specific scout car spawns at this flag upon capture. A QF 1 AA gun is set up in the hilltop trench line, behind the middle pillbox.
")
")
")
")
")
Chezelles Farm[]
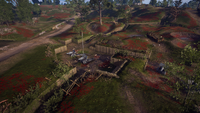
A large farmyard on the southwestern side of the Aisne. It consists of a semi-detached cottage facing the northern road, two barns along the south side, and a small shed. The area is partially enclosed to the west by a high garden wall, and the south, west and much of the eastern approach is comprised of tilled fields full of haystacks - those spawning in defense of the flag are usually deposited here. To the direct north, a stumpy hill slopes down towards the riverside, the crest obstructing line of sight to the adjacent bridge. A smaller road bridge is found downhill to the northwest.
The flag is fairly isolated from the others by the surrounding open ground, and so grants additional transport options once captured. Two horses can be spawned on directly once seized, and a motorcycle and scout car also available from inside the muddy compound.
")
")
")
")
")
Aisne-Vesle Bridge[]
A major bridge at the center of the map. Built to carry the connecting railway over the gorge, it is wide enough to accommodate other vehicles including tanks, also narrowly fitting the Char 2C. On top of the bridge, the absence of cover can leave infantry capturing the flag in enfilade. The thin, long capture zone mirrors the horizontal length of the bridge, giving players little choice of where to occupy the bridge from, although two arch spans allow infantry to run alongside the bridge, taking cover in the gaps between the bridge supports.
With enough damage from explosives, the viaduct can be destroyed, forcing ground vehicles to ford the river at the trench networks or cross the road bridge linking the farms. Once demolished, the rubble remains pile up in the river, forming an artificial island upon which the capture zone is transferred to. The debris grants better cover to infantry, but is still exposed to elevated fire from the river banks or from the still-standing bridge supports that look directly upon the collapse.
A Trench Raider kit spawns underneath the supports at the south end of the bridge. A QF 1 AA gun is found in the tank graveyard further south along the rail track. A scout car spawns at the north end, alongside the car spawned by Notre Dame Ridge.
")
")
")
")
")
Notre Dame Ridge[]
Another trench system on the eastern side of the Aisne. Between the riverside and the capture zone are three lines of trenches, leading successively uphill towards the ridgeline where a BL 9.2 Siege Gun (inactive in this game mode) resides in a square dugout lined with sandbags and wooden supports. The hilltop position is the focus of the capture zone, which does extend a short way into the support trenches leading up to the gun battery.
A scout car spawns by two inoperable howitzers to the west of the flag, near the excavations near the north end of the Aisne-Vesle Bridge.
")
")
")
")
")
Le Cormieux Farm[]
A small farm on the northeastern side of the river. Two interconnected buildings and a third shed surround a low-sitting clearing enveloped by earthen mounds, between which are roads and pathways into the objective. A lumber pile in the middle of the clearing, and more behind the buildings on the southwest side are the only other notable cover positions. The northern hillside, which lies at the edge of an open field between the farm and the German spawn at the rail station, can be a strong defensive position if the French can occupy it.
A scout car is provided by this objective. Another QF 1 AA gun is located in the middle of the clearing.
")
")
")
Operations[]
Rupture serves as the second half of "Beyond the Marne", which sees the French Army resuming its counter-offensive against the German Empire.
Sector 1[]
The first phase of attack is against the eastern edge of the southern defensive belt, with the French attacking through the open fields to reach the frontlines. Objective A is south of the main road, and is the Distillery Ruins. The position is surrounded by a thin belt of trenches running through the flatlands of poppies, with a separate zipper trench continuing to the northwest, giving the German defenders a route of counter-attack. The ruin itself consists of several partial and completely collapsed buildings that offer rudimentary, if semi-permanent cover. Objective B, the Moltke Trench is north of the highway, the position housing a number of static howitzers. Those inside the capture zone are obscured by the high walls, forcing attackers to jump into the trench and into a possible melee for control of the flag.
The French bring with them two tanks against a German line well prepared with emplacements. In addition to a single tank of their own, the defenders are reinforced with two field guns in front of the Distillery, with another further up the hill behind Moltke. The pillboxes and trench lines facing the French bristle with heavy machine guns, proximal to Moltke Trench.
Sector 2[]
Breaching the first line, the French make a concentrated assault against Côte 60. This single objective phase sees the attackers attempt to seize the high ground where the three pillboxes stand guard over the neighboring trench network. Fighting to push the Germans off this vital summit can be difficult due to the expansive capture zone, and nearby spawning positions for the defenders, who counterattack through the shielded trenches west of the objective.
Two planes become available per side at this point, with a single QF 1 AA gun at the Côte 60 summit being the German's main defense against air attack.
Sector 3[]
The battle opens up again, significantly at the third stage, where the French must take and hold three objectives simultaneously. Objective A, Notre Dame Ridge, is defended with numerous HMGs and a field gun, emplaced to defeat any tanks crossing the pontoon at the southeast foot of the hill. Objective B is the Aisne-Vesle Bridge, which has been fortified by numerous sandbag walls and gun positions along its length, but can still be collapsed by either side if the situation demands it. Objective C is the Le Cormieux Farm, the closest objective to the German deployment for this sector, which is across the fields to the north around the train station and railway gun.
Sector 4[]
The final phase sees the French sweep through the German transport hub north of the Aisne. Objective A, is the Langer Max Gun - a rail-mounted siege gun parked on a side track east of the station. The position is reinforced heavily with machine guns and a field gun, with the French having to again advance across open ground to reach the control point. Objective B is the Bazoches Station itself, with a capture zone that mostly concerns the inner compound west of the platform, surrounded by buildings.
One this sector is overcome the French are declared the victors, with the Germans now relieved of much of the ground gained in their Spring Offensive earlier in the year.
Frontlines[]
Progression in Frontlines is made in a zig-zag shape. The map's northeastern and southwestern extremities are cut off, restricting players from entering Chezelles Farm or the railyard near the Langer Max Gun. Of the three objectives, two are on the north side of the river and one is on the south.
Each team is allocated two horses and one tank for vehicular support.
French Base[]
The French telegraphs are in and around Moltke trench at the eastern foot of Côte 60. One is found in the support trench southwest of the gun battery, the other is in the neighboring position to the direct north.
")
")
")
Côte 60 Trenches[]
This objective's zone of control is in the trenches and pillboxes on the hill top, as well as the deeper trenches immediately in front of the position.
")
Notre Dame Ridge[]
The central objective is in the main trench line of Notre Dame Ridge, concentrated around the deactivated BL 9.2 Siege Gun.
")
Le Cormieux Farm[]
The cluster of buildings and dividing ridgeline is the site of one of the three objectives.
")
German Base[]
The German telegraphs are found inside buildings at Bazoches Station. The first is in the single-story house on the southern edge of the complex. The second is on the north side, on the ground floor of the multi-storey station building next to the track.
")
")
")
")
Rush[]
Rush takes place across the east side of the map, starting in the poppy fields south of the river before crossing over in the later stages. Although ostensibly a brief operation of only three sectors, the French attackers receive extra reserves (120 instead of the usual 75) as a handicap, due to the telegraphs' emplacement on highly defensible terrain and the long distance between each sector.
Sector 1[]
In the first stage of the battle, the French are tasked with leaving their base in the Distillery Ruins, crossing the road south of the overgrown trench line and destroying enemy positions around the summit of Côte 60. Objective A is in the western pillbox - the closest to the French start point. Objective B is in a support trench between the other two pillboxes.
The French are allocated a Trench Raider kit for their assault on Côte 60.
Sector 2[]
In the next phase, the French must cross the river and attack the secondary German defense line on the north bank, around the high ground of Notre Dame Ridge. Objective A is by the command post next to the siege gun. Objective B is to the southwest, in a trench nearer to the riverbank and the Aisne-Vesle Bridge.
In addition to retaining their Trench Raider elite kit, the French are given control over a single tank at this point. For their part, the Germans have access to an array of artillery to repulse the French spearhead, with two FK 96 field guns guarding the east and west flanks of Notre Dame, in addition to the BL 9.2 Siege Gun at the objective becoming operational.
Sector 3[]
The last attack is directed north, across the open fields towards the fortified sidings housing the German railway artillery. Objective B is on the southeast corner of the yard, whereas A is further forward along the west side.
The French lose the support of their tank and elite kit, while the Germans are reinforced by a Sentry SMG.
Domination[]
Domination takes place around the larger map's southeast corner, amongst the trenches and craters that surround Côte 60. Players are prevented from crossing the road further south or reaching the riverbank to the north. The three objectives are all found near the edges of the map, with a vast area of "no-man's-land" between them.
Côte 60 Trenches[]

The objective is located by the middle pillbox at the top of the hill, with a capture zone that expands along the square trench but stops before the western pillbox. All three concrete structures start of the match already breached, lessening their defensive posture.
Mahler Trench[]
The most expansive of the three objectives is in the north. The partially destroyed trench is intersected by several tank wrecks and a patch of dismembered trees.
Moltke Trench[]
The artillery pit, located on the southeast edge of the boundaries. The capture zone only concerns the southern position, with the similar fortification directly adjacent left outside the radius.
Team Deathmatch[]
Team Deathmatch takes place past the north bank of the river, around the objectives of Bazoches Train Station, the Langer Max railway gun, and the ridgeline between the two. The open fields leading to Notre Dame Ridge as well as La Cormieux Farm are cut off from play.
War Pigeons[]
War Pigeons take place in the same area as Team Deathmatch.
Gallery[]
")
")
")
")
")
")
")
")
")
")
")
")
")
")
")
")
")
")
")
")
")
")
")
")
")
")
")
")
")
")
")
")
")
")
")
")
")
| ||||||||||||||||||||
Trivia[]
- Beyond Chezelles Farm (Conquest C flag), a secret Cavalry Sword can be found propped on a small bonfire just out of bounds. The sword inflicts more damage than normal, guaranteeing a kill with each hit. The sword and its setting refer to the Dark Souls series.
- The Langer Max gun is based on a series of eight 38 cm SK L/45 siege guns manufactured by Krupp AG of Germany. Earlier guns used in Verdun were originally mounted on concrete.
- In the game files this map is named MP_Graveyard.
- Several tiny houses can be found around the map, hidden in vegetation.